Another Italian project

Whats on your mind? Alfa related or otherwise, the funnier the better!
NEG
Posts: 306
Joined: Wed Oct 29, 2014 12:30 am

Re: Another Italian project

Post by NEG »

Thanks guys, warning long post!

Today was an ‘interesting’ day. Decided to do the oil change at last, not too difficult although you do have to raise the car on the drivers side to gain access to the filter from underneath...30~45min job turned into an afternoons work!

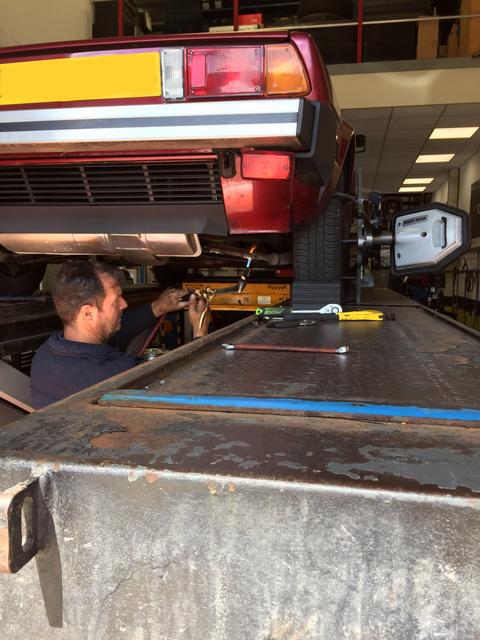
So I backed the car into the garage and got to work.

Access to the sump plug is ok and I have an oil catch tank that just about slides underneath the car...all good...I know the catch tank is a bit shallow so I normally undue the sump plug and hold it in place to slowly drain the oil. However, as I was using my left hand I managed to drop the sump plug! Faced with a waterfall of stinking old oil heading my way I had to resort to rolling out of the way before I was covered in the stuff.

What ensued next involved three rolls of kitchen roll and all the remaining rags I had to build a dam to stop and mop up the oil before it spread too far...to be honest I’m quite surprised and impressed how far 4 lifters of oil can spread in a few minutes! :lol:

To compound the issue I’d forgotten to remove the top plug from my catch tank so the full contents of the sump dumped itself all over the garage floor and none made in to the tank!

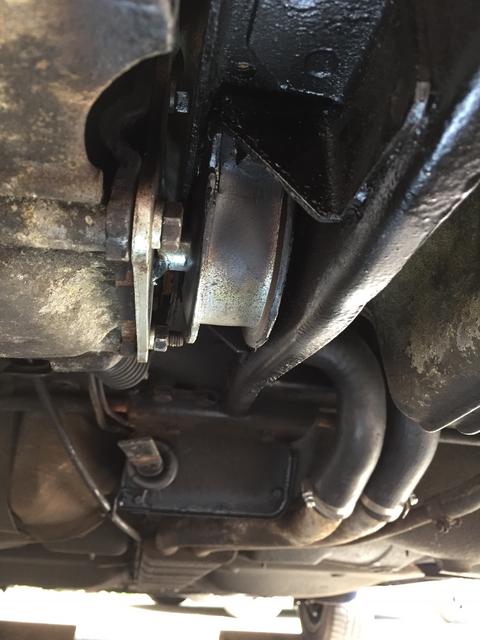
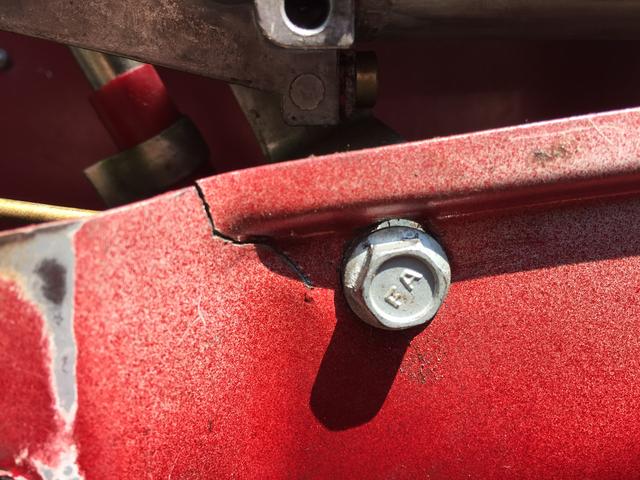
Having managed to stop the oil slick from going further I had to get the filter off and refill with new oil before I could move the car. 2nd however, this was not the correct sump plug...and it had been fitted with a fibre washer to pack it out as it wouldn’t tighten up with just the correct washer fitted. I was wondering why it leaked :D Having no choice I had to use two of the correct washers and another fibre washer just to get it to seal! FFS...new one on order!

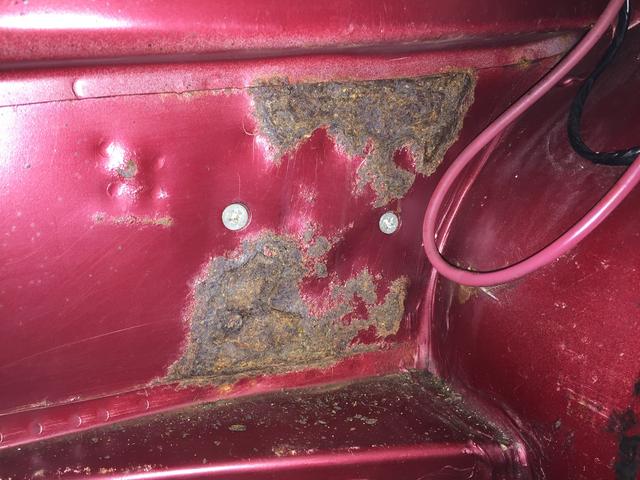
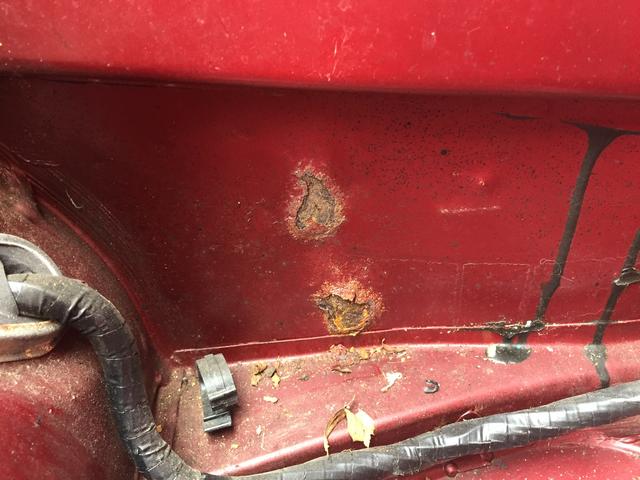
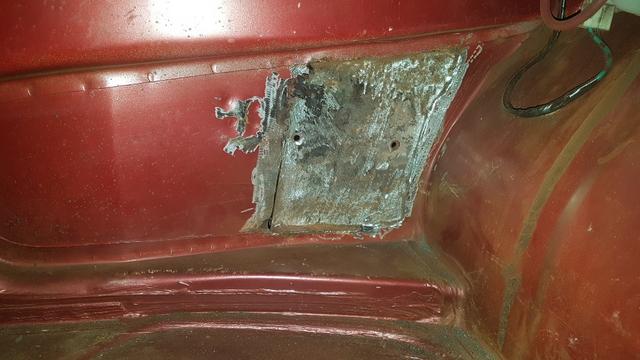
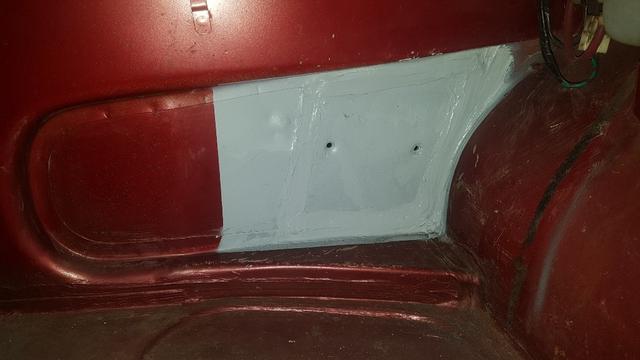
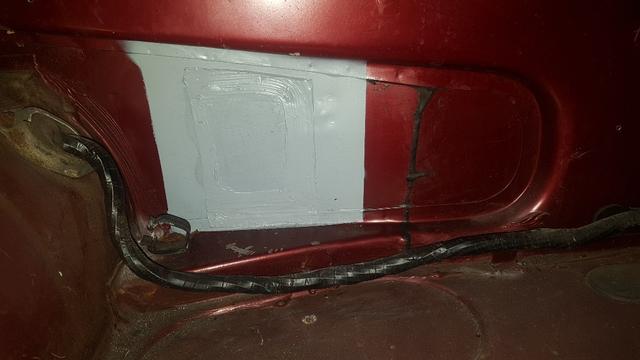
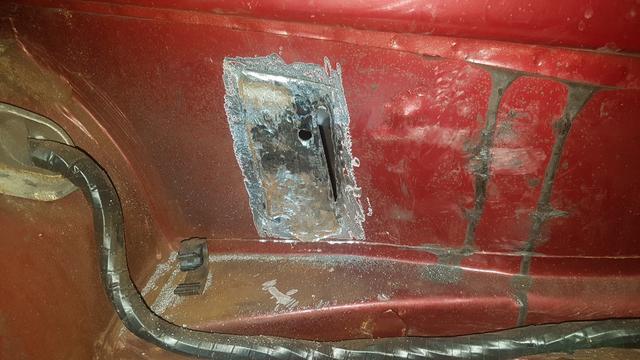
I’m starting to realise the amount of bodging and neglect this car has suffered over the years.

At least the filter came off easily, With a new filter on and sump plug fitted and with my washer stack under the sump plug I refilled the car with new oil and drove it out of the garage so as I could start the clean up!

2 hours later I was done...I’ll have to go over the floor again as it’s not fully clean and smells strongly of oil...I’m too old for this stuff :mrgreen:

User avatar
KevJTD
Posts: 5111
Joined: Thu Sep 26, 2013 8:48 pm
Location: Lincs

Re: Another Italian project

Post by KevJTD »

Lol, I know that feeling!
What a mess it all makes!
Really is annoying when simple jobs turn sour, makes you wonder why we bother!

I've done the same thing with the flat oil catchers too, hot oil is too fast for the catch section to keep up with!!
Giulietta JTD 170
Lancia Delta integrale
Lancia Flavia coupe 1.8 1963
Lancia Dedra turbo
Renault Clio 197 RS

I'm bad with people things
But I should have tried more

Sud 145
Posts: 1511
Joined: Mon Jan 27, 2014 11:08 pm
Location: West Sussex.

Re: Another Italian project

Post by Sud 145 »

Don't have that problem with my 5L Duckhams can but last oil change I did manage to squish it under the exhaust.

Kegsti66
Posts: 2853
Joined: Fri Sep 26, 2014 7:20 pm
Location: Northamptonshire

Re: Another Italian project

Post by Kegsti66 »

Glad I am not the only one who seems to turn everything into five times more than it should be. :lol:

NEG
Posts: 306
Joined: Wed Oct 29, 2014 12:30 am

Re: Another Italian project

Post by NEG »

I learnt something about gearbox oils today. The X19 does not use an EP oil, apparently EP oil royally screws the gearboxes up...something to do with the additives corroding the yellow metals (I presume some type of bronze) used in the syncros. Straight SAE90 is called for meeting GL3 spec. Now this is not easy to find but I managed to locate a Fiat specialist in South London who has it in stock http://www.ricambio.co.uk

Alternatively and I’m dubious of this 20W50 can be used as a substitute....ok....or better Lambretta gear oil as it meets SAE90 / GL3....who knew!

NEG
Posts: 306
Joined: Wed Oct 29, 2014 12:30 am

Re: Another Italian project

Post by NEG »

Managed to get a test drive in after changing the gearbox oil which was straight forward. A box full of the correct stuff has made a huge and surprising difference to the gearchange, it no longer crunches on downshifts and feels silky smooth to use. Result. It’s still possible to beat the box, you have to be quite deliberate with the changes you can’t rush the box but the improvement is noticeable. I’m starting to get a feel for the balance of the car and it’s quite a nice thing to drive.

Sud 145
Posts: 1511
Joined: Mon Jan 27, 2014 11:08 pm
Location: West Sussex.

Re: Another Italian project

Post by Sud 145 »

It's known as mechanical empathy.

NEG
Posts: 306
Joined: Wed Oct 29, 2014 12:30 am

Re: Another Italian project

Post by NEG »

Been tidying up some wiring and cleaning contacts, wipers didn’t run on full speed found a bad spade connector was the cause. The speedo has consistently indicated 5+ mph over actual and bounced around a lot with a clicking noise. The needle didnt sit at zero so I pulled the cluster out and removed the speedo to pull the indicator hand off and reposition.

At the same time I’ve replaced the short speedo cable from the cluster to the bulkhead mounted cable ( it’s in two parts, short one on the back of the cluster and a very long one that runs all the way back to the gear box). The original one was broken but this hasn’t fixed the ticking noise and the needle still bounces about as before, In fact the ticking noise is worse! Guess I’ll have to take it all out again :roll:

NEG
Posts: 306
Joined: Wed Oct 29, 2014 12:30 am

Re: Another Italian project

Post by NEG »

That’s one long speedo cable!

Image

Must be a good 10ft long. It’s in good nick actually, greased it up and managed to force it back down the outer cable. Pulled the console out and re greased the short section and paid careful attention to reassembly and the lay of the cable. Seems to,have done the trick, the needle just vibrates a touch and the indicated speed is 2~3 fast so not bad. The ticking was still there to start with which I’m putting down to the pattern part cable but it seems to have quietened down a touch so fingers crossed it will bed in. Onwards!

junior
Posts: 1196
Joined: Fri Dec 19, 2014 7:43 pm

Re: Another Italian project

Post by junior »

Are you getting near the end or is there a lot of niggles to chase yet.

Fully understood the oil change calamity, once did one in super quick time, dead easy and then drove over my socket set as I left the garage. :roll:

NEG
Posts: 306
Joined: Wed Oct 29, 2014 12:30 am

Re: Another Italian project

Post by NEG »

Still a way to go unfortunately, need to replace the heater fan switch and oil pressure sender....been putting this one off as it's another ball ache job.

Door and Targa roof seal need replacing as the originals are falling apart and the door cards need to come off to be repaired as some gorilla has broken the plastic clips and torn the card holes :roll: then tried to stick them back on with bathroom sealant....I kid you not.

Major stuff will be the steering and suspension. Front radius arm bushes are perished and the control arm bushes are suspect. I hope the ball joints are OK as they are not replaceable individually, you have to buy the whole arm and.........you can only get the n/s units, nobody has the o/s :shock: Anybody know of a company who can refurbish suspension parts?

The rear will need similar work but all the bits are available. The shocks and springs seem OK.

Then at some point it will need a respray...so loads to do :mrgreen:

NEG
Posts: 306
Joined: Wed Oct 29, 2014 12:30 am

Re: Another Italian project

Post by NEG »

The electric windows have been bugging me and when the passenger window refused to go down I decided to take the door cards off and sort them out along with waxoyling inside. The passenger window just needed adjustment, the rubber stop was pushing past a metal stop plate and getting stuck hence it not retracting.

The drivers side window was not aligned properly and the rear of it was raied above the front and catching on the targa roof. Unfortunately one of the drivers side mounting points has developed a tear in the metal frame work! I’ll have to get that brazed or welded up to put some strength back into it.

I’ve replaced the door card clips but I’ll need to revisit the drivers side to repair the torn holes correctly.

Nice, bathroom sealant!

Image

Tear in the metal:

Image

NEG
Posts: 306
Joined: Wed Oct 29, 2014 12:30 am

Re: Another Italian project

Post by NEG »

Now preparing for a semi-overhaul of the front suspension and steering. Parts arrived the other day, I’ll be leaving the struts alone as they seem fine. I’ve manged to locate a new old stock O/S control arm so plan to replace both sides. Also going to remove the rack if I can it seems to be leaking fluid badly so need to investigate why.

Managed to replace the oil pressure sensor at last and the gauge now works! I’ve also fixed the handbrake warning light too. Slowly getting there.

junior
Posts: 1196
Joined: Fri Dec 19, 2014 7:43 pm

Re: Another Italian project

Post by junior »

Good effort, keep going. :D

NEG
Posts: 306
Joined: Wed Oct 29, 2014 12:30 am

Re: Another Italian project

Post by NEG »

Discovered the first bit of rot on the car lurking in the front boot

Image

Not sure if a repair has been attempted as there appears to be two screws holding something in place. The rot is in the o/s inner front wheel arch just behind the strut but it’s not visible from the arch. There appears to be some sort of strengthening plate there fitted in the factory...it runs up to the top of the strut. It’s booked in to my body work guy who chop it out and see what’s what.....

NEG
Posts: 306
Joined: Wed Oct 29, 2014 12:30 am

Re: Another Italian project

Post by NEG »

Opposite side.

Image

Same place, the screws on the other side look factory fitted, the holes are painted, still not sure what they are securing.

This is the plate on the inner wing, I suspect moisture has got behind both plates and rotted the inner wings. Odd though that the plate is showing no signs of it.

Image

NEG
Posts: 306
Joined: Wed Oct 29, 2014 12:30 am

Re: Another Italian project

Post by NEG »

Fast work, weather permitting I’ll start on the front suspension tomorrow

Image

Image

Image

Image

NEG
Posts: 306
Joined: Wed Oct 29, 2014 12:30 am

Re: Another Italian project

Post by NEG »

The threat of torrential rain never materialised so I’ve made a start. N/S is done, final bolt tightening has to be done with the car loaded though. The washers from the inner control arm bush where missing on both sides so somebody has had them off before for some reason...the radius arm to control arm bolt on the O/S is refusing to budge. The nut came off ok but I can’t shift the bolt. Going to leave it soaking in penetration oil and try tomorrow...if that goes ok I’ll see if I can remove the rack.

Radius arm bushes old and new with control arm

Image

Image

User avatar
KevJTD
Posts: 5111
Joined: Thu Sep 26, 2013 8:48 pm
Location: Lincs

Re: Another Italian project

Post by KevJTD »

NEG wrote:The threat of torrential rain never materialised so I’ve made a start. N/S is done, final bolt tightening has to be done with the car loaded though. The washers from the inner control arm bush where missing on both sides so somebody has had them off before for some reason...the radius arm to control arm bolt on the O/S is refusing to budge. The nut came off ok but I can’t shift the bolt. Going to leave it soaking in penetration oil and try tomorrow...if that goes ok I’ll see if I can remove the rack.

Radius arm bushes old and new with control arm

Image

Image

So glad to hear that phrase, drives me insane when folks tighten bushes with suspension on droop :evil: The twist they get when trying to settle at running height must halve their life?
Giulietta JTD 170
Lancia Delta integrale
Lancia Flavia coupe 1.8 1963
Lancia Dedra turbo
Renault Clio 197 RS

I'm bad with people things
But I should have tried more

Simonsud
Posts: 331
Joined: Fri Jan 31, 2014 11:45 am

Re: Another Italian project

Post by Simonsud »

Apart from fiat stillos it was a factory fix for tyre wear to loosen lower arm bolts whilst on ramp and retorque bolts bushes where so soft it would preload them and stiffen them up
Same works for a lot of Audi’s and vdubs with multi link suspension with knocking noises you can’t find
But as a general rule lower arms should be bolted up where they sit on the ground so if you go extremely low reset lower arm bolts

User avatar
KevJTD
Posts: 5111
Joined: Thu Sep 26, 2013 8:48 pm
Location: Lincs

Re: Another Italian project

Post by KevJTD »

So they'd loosen, then retighten the bush bolts with suspension on droop to preload (twist) the bush when lowered again?
Cheeky...
Giulietta JTD 170
Lancia Delta integrale
Lancia Flavia coupe 1.8 1963
Lancia Dedra turbo
Renault Clio 197 RS

I'm bad with people things
But I should have tried more

Simonsud
Posts: 331
Joined: Fri Jan 31, 2014 11:45 am

Re: Another Italian project

Post by Simonsud »

Yes customer would never even be told it was done during a service or if they complain of tyre wear they really needed solid bushes to stop movement
So if any one has a stillo or Fiat multiplier polybush the front end would help no end

NEG
Posts: 306
Joined: Wed Oct 29, 2014 12:30 am

Re: Another Italian project

Post by NEG »

Oh, interesting! I’ll keep it in mind.

Today was actually to hot to work outside, 30c in the shade and 36c in the Sun ☀️ I lasted 20 mins and called it a day!

NEG
Posts: 306
Joined: Wed Oct 29, 2014 12:30 am

Re: Another Italian project

Post by NEG »

Rack removed and refitted.

Image

It cleaned up well, the boots and mounts looked ok but I replaced them anyhow. The oil had leaked from the boots in any case and upon removal of the mounts I could see they where starting to go hard. There where no signs of play so I left the yoke alone.

Image

Refilled with 140ml of EP90 and got it back on the car.

Image

New track rod ends went on only for me to discover they are longer than the originals so my careful counting of the number of turns when removing the old ones went out of the window!

Image

NEG
Posts: 306
Joined: Wed Oct 29, 2014 12:30 am

Re: Another Italian project

Post by NEG »

Question of the day: when fitting new steering gaitor do you lubricate the inside before fitting?


The correct answer to that is yes you should. Why?


Well, when you have cleaned the steering arm and fitted the new rubber gaitor securing it tightly with a tie wrap to ensure it doesn’t leak you create a rather tight bond between the grippy rubber and the arm.

So when you come to adjust the tracking by turning the steering arm you end up turning the gaitor as well. If you don’t notice eventually the gaitor will twist tightly enough to split!

Guess who has just found this out....well to be fair I must have forgot as I’d lubed the other gaitor and it’s ok.

I’d just got the tracking close enough so I could drive the car using the old string method when I noticed a pool of oil under the car. Flipping heck.

I’m now faced with replacing the drivers side gaitor and trying to refill with oil with the rack on the car.....I’m sure as hell not going to take the dam thing off again. Dam it, I’m so angry with myself.....a beer is called for.

junior
Posts: 1196
Joined: Fri Dec 19, 2014 7:43 pm

Re: Another Italian project

Post by junior »

At those times I always think that it could be a lot worse.

A friend in San Jose had a work mate steal a job off the firm by offering to set up a customers carbs at home.

He started, blipped the throttle, it spat out some fuel and as no air filter present it caught fire. :?

He dashed in the house to get the fire extinguisher, but by the time he got out it was not enough to put out the fire.

The car burnt to a shell and took his house with it before the fire brigade arrived.

He had insurance on his house, but nothing for working on a Ferrari.

NEG
Posts: 306
Joined: Wed Oct 29, 2014 12:30 am

Re: Another Italian project

Post by NEG »

Ouch! How was that resolved with the owner?

Second new gaitor now fitted, thank fully. Another tricky job! Trying to get it back on when covered in oil was like trying to straighten a slippery eel LOL! Once it went on I tie wrapped one end leaving the outer end open so I could just get the nozzle of a small oil can pushed in to refill with oil. Think I got most of it in 100ml or so, no way of knowing really.

Loaded the car up with two unwilling family members and some weights and tightened everything up. 4 wheel alignment booked for later today.

NEG
Posts: 306
Joined: Wed Oct 29, 2014 12:30 am

Re: Another Italian project

Post by NEG »

Got the wheel alignment done on the X a few weekends ago. As expected the front toe was out but so was the rear. The rear is adjustable but thirty years of rust and muck meant a bit of effort was needed to loosen things off a bit!

Image

The good news is the chassis is straight no signs of any previous accident damage. As it was a busy Saturday we ran out of time to get the front castor set. To change it means the front radius arms have to come off and the shims removed, the guys made a suggestion to remove two shims from the drives side and one from the passenger then come back to check and readjust toe.

Image

Yesterday I decided to replace the bottom engine mount. Thought it was an easy job but it’s not possible to remove the mount without taking the for-aft cross member out that it’s bolted too. Fiat in their wisdom have fitted a stud ad one of the mounting ‘bolts’ and this means you can’t simply remove it.

The other issue I didn’t find out about until I got everything mounted back on the car is that the pattern part I have is not great quality, they have managed to drill one of the mounting plate hole in just the wrong place! Unfortunately this is one OEM part that is unobtainable.

New and old
Image

Engine cross member, runs front to back

Image

NEG
Posts: 306
Joined: Wed Oct 29, 2014 12:30 am

Re: Another Italian project

Post by NEG »

I’ll have to eat my own hat, the holes where in the right place after all. I just needed to fit the cross member and mount loosely and twist the mount a touch so as the holes lined up! With all the bolts in place I just needed to tighten everything up.

Sag is less on the new mount and clearances better. Onwards!

Image

NEG
Posts: 306
Joined: Wed Oct 29, 2014 12:30 am

Re: Another Italian project

Post by NEG »

Not much progress recently but I have managed to underseal the rear wheel arches after dry brushing out the remaining muck.

Image

Still have the rear wishbone bushes to replace and that should be the last thing mechanically that needs doing...hopefully.

Noticed water is getting into the passenger foot well. Seems to be running down from the base of the A pillar, it puddles just under the dash and the drips down the left side of the footwell wetting the carpet. Not sure how it’s getting in other than via the windscreen but they are bonded in on the X1/9. Deeper investigation is required.

Post Reply